


ผลิตภัณฑ์ทั้งหมด
-
 บรูโน่ นาซิเมนโตขอบคุณสําหรับความช่วยเหลือและการสนับสนุนอย่างต่อเนื่อง ในการให้ผลิตภัณฑ์ที่มีคุณภาพสูงและราคาถูก
 -
 เอฮซาน ซัลมารีการตอบสนองอย่างรวดเร็วและทัศนคติมืออาชีพ ทําให้การร่วมมือของเราเรียบร้อยขึ้น
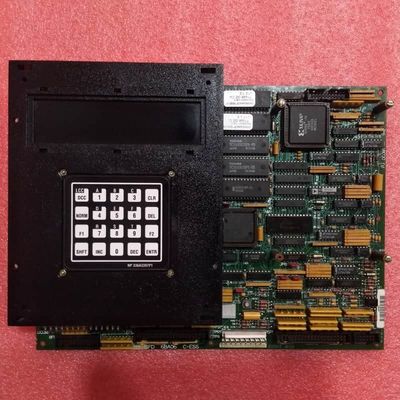
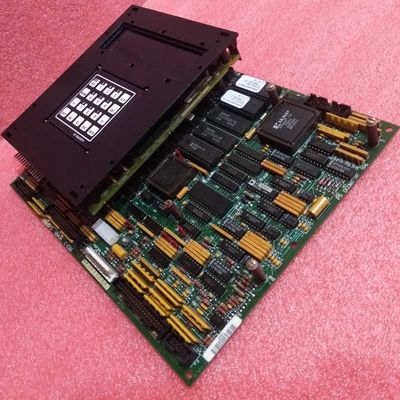
การ์ดควบคุมไดรฟ์ GE Mark V Series พร้อมความสูง 200 มม. ความกว้าง 100 มม. และการรับประกัน 1 ปีสำหรับระบบควบคุมกังหัน


| สถานที่กำเนิด | สหรัฐอเมริกา |
|---|---|
| ชื่อแบรนด์ | GE |
| ได้รับการรับรอง | COO |
| หมายเลขรุ่น | DS215GASCG4AZZ01A (DS200SDCCG4AEC+DS200SLCCG3ACC) |
| จำนวนสั่งซื้อขั้นต่ำ | 1 |
| ราคา | $1500 |
| เวลาการส่งมอบ | 5-7 วัน |
| เงื่อนไขการชำระเงิน | t/t |
| สามารถในการผลิต | 999 |
รายละเอียดสินค้า
| ชื่อ | GE DS215GASCG4AZZ01A (DS200SDCCG4AEC+DS200SLCCG3ACC) การ์ดควบคุมไดรฟ์ | รหัสผลิตภัณฑ์ | DS215GASCG4AZZ01A (DS200SDCCG4AEC+DS200SLCCG3ACC) |
|---|---|---|---|
| ชุด | Mark V | น้ำหนักสุทธิผลิตภัณฑ์ | 2 กิโลกรัม |
| ความลึก/ความยาวของผลิตภัณฑ์สุทธิ | 330 มม. | ความสูงของผลิตภัณฑ์สุทธิ | 200 มม. |
| ความกว้างของผลิตภัณฑ์สุทธิ | 100 มม. | การรับประกัน | 1 ปี |
| เน้น | การ์ดควบคุมไดรฟ์ความสูง 200 มม.,บอร์ดควบคุมไดรฟ์ความกว้าง 100 มม.,การ์ดควบคุมกังหันรับประกัน 1 ปี |
||
รายละเอียดสินค้า
GE DS215GASCG4AZZ01A(DS200SDCCG4AEC+DS200SLCCG3ACC) การ์ดควบคุมไดรฟ์
ภาพรวมผลิตภัณฑ์
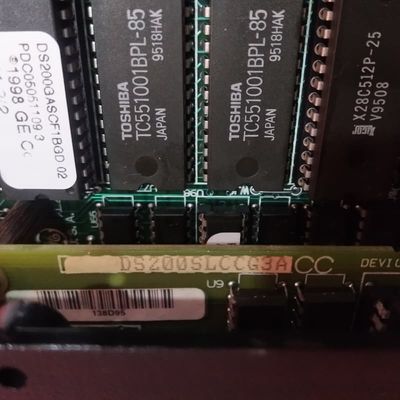
GE DS215GASCG4AZZ01A(DS200SDCCG4AEC+DS200SLCCG3ACC) เป็นบอร์ดควบคุมไดรฟ์หลักที่ออกแบบมาสำหรับระบบไดรฟ์อุตสาหกรรม ซึ่งน่าจะถูกรวมเข้ากับระบบควบคุมกังหัน GE Mark V การ์ดควบคุมขั้นสูงนี้มีไมโครโปรเซสเซอร์พิเศษสามตัว:
- โปรเซสเซอร์ควบคุมไดรฟ์ (DCP):จัดการงานระดับระบบ รวมถึงการถอดรหัสการเลือกชิป, การเข้าถึงหน่วยความจำโดยตรง (DMA) และการควบคุมการขัดจังหวะ
- โปรเซสเซอร์ควบคุมมอเตอร์ (MCP):จัดการฟังก์ชันเฉพาะของมอเตอร์
- โปรเซสเซอร์ร่วมมอเตอร์ (CMP):ประมวลผลงานที่ต้องใช้คณิตศาสตร์อย่างเข้มข้นเกินความสามารถของ MCP
คุณสมบัติหลัก
- ฟังก์ชันการทำงานที่ขยายได้:รองรับการ์ด LAN และโปรเซสเซอร์สัญญาณเสริมสำหรับความต้องการด้านการสื่อสารและการประมวลผลสัญญาณที่หลากหลาย
- การวินิจฉัยที่ใช้งานง่าย:แผงด้านหน้า LED 10 ดวงพร้อมการเข้ารหัสข้อผิดพลาด BCD/ไบนารีช่วยให้ระบุปัญหาได้อย่างรวดเร็ว
- ฮาร์ดแวร์ที่กำหนดค่าได้:จัมเปอร์ JP/WJ ที่ตั้งค่าจากโรงงานช่วยให้มั่นใจได้ถึงความเข้ากันได้พร้อมความยืดหยุ่นสำหรับการปรับเปลี่ยนของผู้ใช้
- การออกแบบที่แข็งแกร่ง:RAM ที่ใช้ร่วมกันช่วยให้เข้าถึงได้พร้อมกันหลายโปรเซสเซอร์เพื่อการทำงานที่มีประสิทธิภาพ
- การติดตั้งที่ปลอดภัย:รวมถึงตัวเว้นระยะ, ความเข้ากันได้ของแหวนรองไนลอน และแนวทางการถ่ายโอน EPROM
การติดตั้งและการบำรุงรักษา
สำหรับการติดตั้ง/เปลี่ยนอย่างปลอดภัย:
- ถอดแหล่งจ่ายไฟทั้งหมดก่อนการติดตั้งเพื่อป้องกันไฟฟ้าดูด
- ถอดสายเคเบิลออกจากการ์ดเสริมและสกรูยึดก่อนถอดบอร์ด
- ถ่ายโอนโมดูล EPROM จากบอร์ดที่ชำรุดไปยังหน่วยทดแทน
- ใช้แหวนรองไนลอนจากโรงงานเพื่อป้องกันความเสียหายของสกรูระหว่างการประกอบใหม่
- ตรวจสอบให้แน่ใจว่าตัวยึดพลาสติกถูกขันแน่นอย่างถูกต้อง
หมายเหตุ: ข้อมูลจำเพาะและคุณสมบัติทั้งหมดอาจมีการเปลี่ยนแปลงโดยไม่ต้องแจ้งให้ทราบล่วงหน้า อ้างอิงเอกสารของผู้ผลิตเสมอสำหรับข้อมูลล่าสุด
แนะนำผลิตภัณฑ์